Weed grinders require instant cleanliness for everything to run smoothly. After continuous use of your weed grinder for a few months, some resin will stick on your grinder. As a result of this, the grinding process will become a more tiresome and challenging task.
Once it is too clogged up, it might not be adjustable for smooth operation. Sometimes if you lack a high-end grinder, the teeth of your grinder may break as a result of stickiness. Cleaning your weed grinder also makes it more efficient to improve the production of more good weed and kief.
Therefore, to help you clean your weed grinder for kief, follow the below steps for proper cleaning of your weed grinder.
Yes, Best Wet Grinder
Guide on how to clean a grinder and save Kief
Step 1: Dismantle your grinder to its components
Disassemble your weed grinder into its small pieces. At this step, you should be much keen because of small parts that can break or get lost.
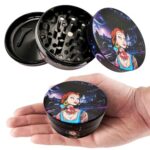
If you own a four-chamber weed grinder, once you finish the disassembling process, you should have a grinding chamber, lid, collection chamber, and finally, a kief chamber. This means that two-piece grinders possess fewer pieces.
Also, we have some weed grinders that have screens placed between the two chambers, i.e., collection and kief chambers. It would be best if you took care when getting this screen to avoid damage; this is because it is fragile and hence can break easily.
Also, avoid exerting much force or a sharp object on this screen that can leave the screen with a hole which may hinder your weed grinder’s performance.
Step 2: Put your weed grinder’s parts in the freezer.
Although this step is not a must, it makes the remaining few procedures much more comfortable. Therefore, under this step, you need to put the parts of your weed grinder inside the fridge for not less than 30 minutes.
This step is significant because it involves dislodging remained sticky canna bits from the screen in between the kief and collection chambers.
Remove your grinder from the freeze then slams it on the table several times till almost all kief falls in the bottom of the collection chamber. Solidification makes kief undergo from sticky to brittle.
Also, scraping kief that did not fell in the bottom of your collection chamber will be accessible after the freezing process. More so, if you decide to use a plastic grinder, handle your plastic weed grinder carefully when getting out of the freezer. Point to note, plastic brittles when placed under low temperatures.
Step 3: Drain your weed grinder.
After removing your weed grinder’s parts from the fridge, hold the elements on a plastic chopping board and then strike them gently versus your hand or on a surface of a chopping board.
Replace the chopping board with a plate or cereal bowl if there is no plastic chopping board. Here, the primary intention of using a dish is to make sure kief leftovers are fully collected.
Step 4: Use a brush to remove weed leftovers/Kief from your weed grinder.
This stage involves brushing. Therefore, use a toothpaste brush to clear and remove all sorts of plant bits from grinder parts. Also, you should use a small paintbrush if you don’t have a toothpaste brush. This is because using a big paintbrush like a wall hand brush will leave your grinder with little weed leftovers.
Besides, use a scrap or a toothpick for stubborn gunk that might be reluctant to come out from your grinder. Most grinders come with their tiny plastic scraper for removing stuck residues.
Also, other grinders come with guitar picks that serve the same purpose, which is scraping. But, if you have a metal grinder, you should avoid metal scrapers because it will not scratch your grinder.
To add on this, the grinder is a buildup of material that might not react positively through brushing; hence, scraping is advisable.
Step 5: Use isopropyl alcohol substance and water to clean your weed grinder.
Under this step, two sub-steps are essential when cleaning your weed grinder. Therefore, it is crucial to use isopropyl alcohol on metal grinders; place your grinder’s parts inside a small plate containing isopropyl alcohol substance.
Using this substance kills bacteria and germs that may hide in your grinder. Also, allow the plate to unsettle unmanageable plant residues to get loose.
Please wait until all parts are immersed in the alcohol until it turns to a color showing loosen up particles. Isopropyl alcohol is a potent substance used to clean metal grinders.
This alcohol liquid ensures extensive cleaning and collecting of kief; place your grinder’s parts into a polythene bag containing isopropyl alcohol and leave it to dissolve all kief.
Without forgetting plastic grinders, use boiled water to clean your weed grinder. Immerse all parts into a hot pot and leave them for about 3 minutes, then use tongs to get them out of hot water to cool. Also, you can use a towel to cool the grinder parts. Give the parts enough time to cool until they reach the average temperature.
Step 6: Assemble your grinder’s parts back.
After your grinder’s components are fresh, collect the pieces gently and fix them back to their positions and store it safely for the next use. I think at this step, you should smile after a lengthy cleaning process.
Frequently Asked Questions
Q: For how long can one freeze Kief?
A: Freeze your grinder for about half an hour to extract plant matters and weed leftovers. Place your weed grinder in the fridge then get it after about 30 minutes.
Q: How frequently can one clean a grinder?
A: Cleaning of your grinder varies depending on how often you use it. Therefore, when you grind, let’s say twice or once in 30 days, you need to clean it after two months. Frequently used grinders should be cleaned weekly.
Q: How do you deep clean a grinder?
A: Cleaning your coffee grinder is a necessary step in order to maintain its performance and quality. Not only will a clean grinder produce better-tasting coffee, but it will also last longer.
To deep clean a grinder, you’ll need some basic supplies including a brush, cleaning solution, and vacuum. The first step is to remove the burrs from the grinder. You can do this by unscrewing the top or bottom of the grinder, depending on the model.
Once the burrs are removed, use the brush to clean off any grounds or residue that may be stuck inside. Next, soak the burrs in the cleaning solution for a few minutes. Finally, use the vacuum to remove any excess liquid or debris.
Replace the burrs and reassemble the grinder.
CONCLUSION
After going through the above steps, I hope that you now know how to clean a grinder and save Kief. Leaving your weed grinder clean always plays a vital role in the smoking period.
Take your time to go through the above-discussed steps to clean a weed grinder regularly, and believe me, your efforts will bear fruits when the next smoking period arrives. I know when the grinding process is over, many people develop some laziness that might end up leaving the grinder with dirt.
Therefore, my advice is that you should use that little time and energy to clean your weed grinder immediately after use to prolong its life span.

Hi, this is Cynthia A. Rose. Welcome to my Grinder related blog. Usually, I am busy with my kitchen and cooking all day. My main desire is to create a new recipe every day. But I have to use new tools every day to create new recipes. In this blog, I will share you how to use kitchen tools properly. I will not just share cooking related equipment, I will try to review all kinds of grinders like angle grinder among you. I hope my 12 years of experience will come in handy. Thanks!


